How to Install Buckets and Console
by George Nenadovich
Car Courtesy of Dennis Wheeler
In order to change a car from a bench seat to buckets and console
a few items are needed before starting the project.
Items Needed:
1. Bucket seats correct for year, 68-9 are the same while 70-2 are
the same.
All GM A-bodies share the same bucket seats for the same years. Included
in A-body designation are 68-72 Chevelle, LeMans, Skylark, Cutlass and 70-2
Monte Carlo and Grand Prix.
2. Console, 68-9 console are the same, 70-2 consoles are the same.
1973-77 Regal/Century consoles can be used but will need to be modified
as stated in an article on the site. The shifter and cable from the 73-77
Regal/Century will not work but you can use the trans cable bracket and
selector bracket.
3. Shifter assembly which includes: shifter w/handle, cable, cable
bracket that mounts to the trans pan (TH350 and TH400 brackets are different).
Trans selector bracket which attaches direct to trans gear selector input
shaft.
4. Steering column, either tilt or non-tilt.
5. Bucket seat brackets. If installing a power driver's seat, floor
bracket will be different than non-power seat. Brackets are available as
repro units.
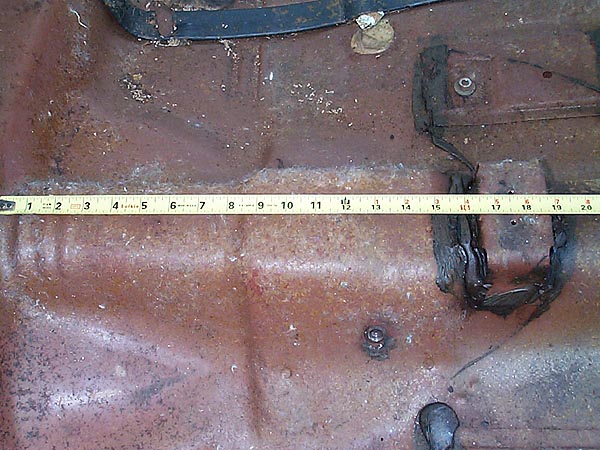 Here is the rear floor console bracket, it is welded to the
floor and can be fabricated from simple sheet metal if need. Distance from
the rear vertical portion(just in front of back seat bottom cushion) of
driveshaft tunnel is 17.5 inches. This dimension is not critical but gives
a close approximation where bracket should be located. Notice width of bracket
to allow for some console movement from front to back.
Here is the rear floor console bracket, it is welded to the
floor and can be fabricated from simple sheet metal if need. Distance from
the rear vertical portion(just in front of back seat bottom cushion) of
driveshaft tunnel is 17.5 inches. This dimension is not critical but gives
a close approximation where bracket should be located. Notice width of bracket
to allow for some console movement from front to back.
 Another pic which shows the location of the shifter's rear
screw holes and the front floor bracket. Distance to rear shifter holes
is 28.5". Use sheet metal screws to mount shifter to floor. Distance
to center of front bracket is 42" as measured from rear as stated above.
Also, notice shifter handle is black for this car which is a 72 GS455. 1970
versions are woodgrain. 1968-9 are black. You can use the upper handle section
(chrome part) from a 73-77 Regal/Century if needed.
Another pic which shows the location of the shifter's rear
screw holes and the front floor bracket. Distance to rear shifter holes
is 28.5". Use sheet metal screws to mount shifter to floor. Distance
to center of front bracket is 42" as measured from rear as stated above.
Also, notice shifter handle is black for this car which is a 72 GS455. 1970
versions are woodgrain. 1968-9 are black. You can use the upper handle section
(chrome part) from a 73-77 Regal/Century if needed.
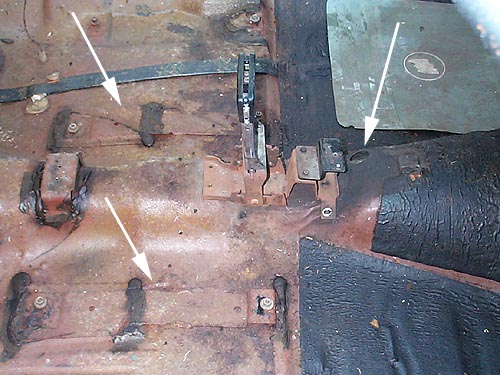 Right arrow indicates the hole for shifter cable to pass
through to transmission. Hole is pre-located on floor pan with a 1/8"
diameter dimple. Use a door hole saw available from Home Depot to drill
the hole, approx 1.5" diameter. Use low drill motor speed and some
lubricating oil to keep the saw blade cool as you drill through the metal
pan.
Left arrows indicate factory floor brackets for manual bucket
seats. These are available as repros. These MUST be welded for proper anchorage.
Do NOT use sheet metal screws to attach these to the floor pans.
Right arrow indicates the hole for shifter cable to pass
through to transmission. Hole is pre-located on floor pan with a 1/8"
diameter dimple. Use a door hole saw available from Home Depot to drill
the hole, approx 1.5" diameter. Use low drill motor speed and some
lubricating oil to keep the saw blade cool as you drill through the metal
pan.
Left arrows indicate factory floor brackets for manual bucket
seats. These are available as repros. These MUST be welded for proper anchorage.
Do NOT use sheet metal screws to attach these to the floor pans.
 Here is the driver's side floor pan, large hole to the left
is for the seat belt retractor. This is a bench seat car converted to buckets,
1970 model. This car has one rear hole, some models have two rear mounting
holes. The bucket seat rear pedestal has two mounting holes...use the outside
one to line up with this hole.
Here is the driver's side floor pan, large hole to the left
is for the seat belt retractor. This is a bench seat car converted to buckets,
1970 model. This car has one rear hole, some models have two rear mounting
holes. The bucket seat rear pedestal has two mounting holes...use the outside
one to line up with this hole.
 Same hole viewed from the bottom....the inside hole (closest
to the driveshaft tunnel) is the one to use for the bucket seat pedestal.
Same hole viewed from the bottom....the inside hole (closest
to the driveshaft tunnel) is the one to use for the bucket seat pedestal.
Here is a diagram showing stud locations for manual bucket
seats. If you have a power driver's seat. The rear studs will be closer
to the firewall by approximately 3".

Total time to install all items including welding should take approx.
2 hours which also includes changing steering columns and ignition key cylinders.