How to Replace a Trunk Floor
by George Nenadovich
 The first item to remove is the gas tank. This will require
you to completely drain the tank. No need to handle extra weight when gas
can easily be emptied. The two straps shown here hold the tank to the gas
tank braces which are welded to the bottom of the trunk floor. The rear
screws are 3/8" hex head. The front bolts are 9/16" hex head.
It is a good idea to spray the bolt threads with PB Blaster to aid with
removal.
The first item to remove is the gas tank. This will require
you to completely drain the tank. No need to handle extra weight when gas
can easily be emptied. The two straps shown here hold the tank to the gas
tank braces which are welded to the bottom of the trunk floor. The rear
screws are 3/8" hex head. The front bolts are 9/16" hex head.
It is a good idea to spray the bolt threads with PB Blaster to aid with
removal.
 Here is the inside of the trunk with the lower arrow showing
the opening for the gas tank sending unit wire. The upper arrow shows the
connector for the sending unit wire.
Here is the inside of the trunk with the lower arrow showing
the opening for the gas tank sending unit wire. The upper arrow shows the
connector for the sending unit wire.
 Here is the gas tank with the left arrow showing the ground
wire (notice end of wire is missing due to corrosion). The right arrow shows
brown sending unit wire. Since the tank is out....good time to check the
sending unit, inspect inside the tank for dirt and paint the tank. This
one is in excellent condition...despite some minor flash rust on the top.
Here is the gas tank with the left arrow showing the ground
wire (notice end of wire is missing due to corrosion). The right arrow shows
brown sending unit wire. Since the tank is out....good time to check the
sending unit, inspect inside the tank for dirt and paint the tank. This
one is in excellent condition...despite some minor flash rust on the top.
 Here is a show of the trunk floor which "appears"
to be in ok condition but the arrow shows sunlight passing through from
the bottom............bad fiberglass work by previous repair person.
Here is a show of the trunk floor which "appears"
to be in ok condition but the arrow shows sunlight passing through from
the bottom............bad fiberglass work by previous repair person.
 Here is the driver's side tank support. Due to massive corrosion....lower
arrow indicates where the capture nut broke loose from the factory snap-clip.
When this happens use a wrench to grab the 9/16" hex nut and then remove
the gas tank bolt. Upper arrow is the tank ground strap with end still in
place....no way to remove this due to corrosion.
Here is the driver's side tank support. Due to massive corrosion....lower
arrow indicates where the capture nut broke loose from the factory snap-clip.
When this happens use a wrench to grab the 9/16" hex nut and then remove
the gas tank bolt. Upper arrow is the tank ground strap with end still in
place....no way to remove this due to corrosion.
 Here is the passenger side gas tank brace....in very good
condition for being 37+ years old.
Here is the passenger side gas tank brace....in very good
condition for being 37+ years old.
 Here is the driver's side gas tank support....heavy corrosion.
 Here is the passenger side support with gas tank capture
nut still in place. Small bracket above it holds the 70 gas tank vent in
place.
Here is the passenger side support with gas tank capture
nut still in place. Small bracket above it holds the 70 gas tank vent in
place.
 Another pic showing driver's side corrosion and sunlight
coming through the floor.
Another pic showing driver's side corrosion and sunlight
coming through the floor.
 Here is a bottom side view where light was passing through
when viewed from above.
Here is a bottom side view where light was passing through
when viewed from above.
 Someone tried to fix this floor using fiberglass when the
proper way to fix the floor is to replace with new metal. Someone used cardboard
as a form to keep the fiberglass resin from falling through the large rusted-out
areas.
Someone tried to fix this floor using fiberglass when the
proper way to fix the floor is to replace with new metal. Someone used cardboard
as a form to keep the fiberglass resin from falling through the large rusted-out
areas.
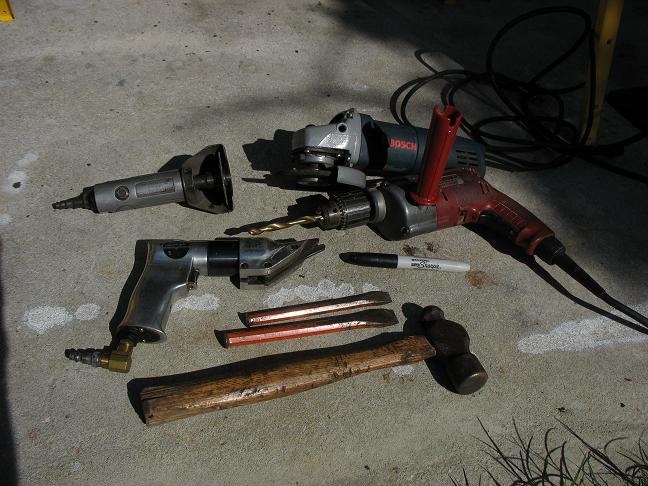 Here are some basic tools needed for trunk floor pan removal.
I like to use the air shears to remove most of the metal quickly. You can
also use a plasma cutter but those are expensive when compared to the air
shears. The drill is used to drill out the factory spot welds. I like to
use the 5/16" "bullet tip" design available from Home Depot.
The Bosch 4" grinder will come in use for the spot weld removal and
new spot welds. The 90 degree die grinder works great in tight places such
as the body supports and tank supports where the air shears will not work.
Here are some basic tools needed for trunk floor pan removal.
I like to use the air shears to remove most of the metal quickly. You can
also use a plasma cutter but those are expensive when compared to the air
shears. The drill is used to drill out the factory spot welds. I like to
use the 5/16" "bullet tip" design available from Home Depot.
The Bosch 4" grinder will come in use for the spot weld removal and
new spot welds. The 90 degree die grinder works great in tight places such
as the body supports and tank supports where the air shears will not work.
 Since I have the body off the frame.....I like to place towels
over the trunk lip/edge to provide a comfortable work surface since I will
be spending many hours leaning over the edge.
Since I have the body off the frame.....I like to place towels
over the trunk lip/edge to provide a comfortable work surface since I will
be spending many hours leaning over the edge.
 Here is the trunk floor after I removed all the fiberglass....about
1/4" of it over the entire floor surface. Now it is clear the amount
of trunk floor rust. Good thing about this rust on the driver's side is
easy removal of trunk floor since all metal is basically rusted away.
Here is the trunk floor after I removed all the fiberglass....about
1/4" of it over the entire floor surface. Now it is clear the amount
of trunk floor rust. Good thing about this rust on the driver's side is
easy removal of trunk floor since all metal is basically rusted away.
 Here is the new one-piece trunk from National
Parts Depot Part C-12981-110A. This is from their Chevelle catalog.
Cost is $90 and this has worked well for me on many cars. This is the wide
version. The narrow version is only slightly narrower. If the entire trunk
floor is bad, you will need to get the three piece set.
Here is the new one-piece trunk from National
Parts Depot Part C-12981-110A. This is from their Chevelle catalog.
Cost is $90 and this has worked well for me on many cars. This is the wide
version. The narrow version is only slightly narrower. If the entire trunk
floor is bad, you will need to get the three piece set.
 Here is the trunk floor after my first rough cut. Notice
badly shaped edges....no need to be clean here...just need to remove most
of the bad material and inspect gas tank and body supports. Notice left
gas tank support is missing....it was badly rusted.
Here is the trunk floor after my first rough cut. Notice
badly shaped edges....no need to be clean here...just need to remove most
of the bad material and inspect gas tank and body supports. Notice left
gas tank support is missing....it was badly rusted.
 Here is the driver's gas tank support.....badly rusted. These
are also available from National Parts Depot, C-12981-125B, for $30 each.
See pic below.
Here is the driver's gas tank support.....badly rusted. These
are also available from National Parts Depot, C-12981-125B, for $30 each.
See pic below.
 Another pic of the gas tank support.
 Here is the tank support with gas tank ground screw still
attached. Notice there are 6 welds for this end. Upper arrow indicates where
one factory spot weld was not good and easily pulled loosed from the trunk
floor.
Here is the tank support with gas tank ground screw still
attached. Notice there are 6 welds for this end. Upper arrow indicates where
one factory spot weld was not good and easily pulled loosed from the trunk
floor.
 New gas tank support from NPD....excellent reproduction.
 Here is the one-piece just placed in trunk for measurements.
This easily slides through the trunk opening. Fit is excellent. Now is the
time to take a Super Sharpie marker or similar and outline the new trunk
pan on the exisiting metal.
Here is the one-piece just placed in trunk for measurements.
This easily slides through the trunk opening. Fit is excellent. Now is the
time to take a Super Sharpie marker or similar and outline the new trunk
pan on the exisiting metal.
 Here is the spare tire hold down. New pans do not come with
this so use the 5/16" drill to drill out all 6 welds.
Here is the spare tire hold down. New pans do not come with
this so use the 5/16" drill to drill out all 6 welds.
 Here is the new pan...notice no spare trunk hold down. Never
throw away old metal until the job is complete because you never know what
items you may need.
Here is the new pan...notice no spare trunk hold down. Never
throw away old metal until the job is complete because you never know what
items you may need.
 Here is the passenger side gas tank support. Arrows indicate
the factory spot welds drilled out of pan in order to remove the rusty metal...some
of the metal wound up on the ground below. Try not to drill through the
supports.
Here is the passenger side gas tank support. Arrows indicate
the factory spot welds drilled out of pan in order to remove the rusty metal...some
of the metal wound up on the ground below. Try not to drill through the
supports.
 Same support with all spot welds ground flush using the 4"
grinder.
Same support with all spot welds ground flush using the 4"
grinder.
 Here is the final cut. Notice black line above it. This is
the edge of the new panel.
Here is the final cut. Notice black line above it. This is
the edge of the new panel.
 Upper arrows indicate outside egdges of driver's side tank
support. This insures the new tank support is placed in exactly the same
location as the original. The lower arrows indicate location of factory
spot welds for support.
Upper arrows indicate outside egdges of driver's side tank
support. This insures the new tank support is placed in exactly the same
location as the original. The lower arrows indicate location of factory
spot welds for support.
 I like to use this product, phosphoric acid, from Home Depot
to neutralize all rust. This works well. Spray it on with a garden spray
or old paint gun. Let it work overnight. Use a brass brush to remove any
chalky residue and then wipe down with lacquer thinner.
I like to use this product, phosphoric acid, from Home Depot
to neutralize all rust. This works well. Spray it on with a garden spray
or old paint gun. Let it work overnight. Use a brass brush to remove any
chalky residue and then wipe down with lacquer thinner.
 This is a good product to spray on all areas to be welded
and those that need additional corrosion protection such as gas tank and
body supports.
This is a good product to spray on all areas to be welded
and those that need additional corrosion protection such as gas tank and
body supports.
 Here is the rear body mount capture nut. Now is the time
to use a 7/16-14 tap to clean the threads and repair the capture cage if
needed.
Here is the rear body mount capture nut. Now is the time
to use a 7/16-14 tap to clean the threads and repair the capture cage if
needed.
 Here is the hole punch/panel flanger and Cleco pliers with
pins. This set-up works
great for install all kinds of sheetmetal.
Here is the hole punch/panel flanger and Cleco pliers with
pins. This set-up works
great for install all kinds of sheetmetal.
 I punch holes in the new metal every 2-3 inches and then
use a 3/16" drill bit to drill the corresponding holes in the exisiting
sheetmetal. This ensures a nice, clean and tight fit. You can buy the pliers
and pins from Racer's Parts
Wholesale and the punch/flanger from Harbor
Freight
I punch holes in the new metal every 2-3 inches and then
use a 3/16" drill bit to drill the corresponding holes in the exisiting
sheetmetal. This ensures a nice, clean and tight fit. You can buy the pliers
and pins from Racer's Parts
Wholesale and the punch/flanger from Harbor
Freight
 Picture showing spot welds to hold trunk pan to new driver's
gas tank support. Repeat for the passenger side.
Picture showing spot welds to hold trunk pan to new driver's
gas tank support. Repeat for the passenger side.
 Here is the front side of the pan. All these holes will be
drilled with a 3/16" bit and then install Cleco pins.
Here is the front side of the pan. All these holes will be
drilled with a 3/16" bit and then install Cleco pins.
 Here is an overhead view of the entire new pan.
 Here is a bottom view showing nice, tight fit with new gas
tank support.
Here is a bottom view showing nice, tight fit with new gas
tank support.
 Here is the pan after all the spot welds are done and ground
smooth. I apply a light coat of phosphoric acid to prevent any future corrosion.
Here is the pan after all the spot welds are done and ground
smooth. I apply a light coat of phosphoric acid to prevent any future corrosion.
 I like to use this product available from Home Depot to seal
all the new seams. This has worked extremely well to replace the original
white seam brush-on sealer. This is black so it blends very well....same
item I use for all the cowl seams. Use a small body filler squeegee to apply
a nice smooth coat. This will make the trunk pan installation hardly noticeable.
Depending on how much floor rust and how much new metal is
needed this job can take from 8-16 hours from start to finish.
I like to use this product available from Home Depot to seal
all the new seams. This has worked extremely well to replace the original
white seam brush-on sealer. This is black so it blends very well....same
item I use for all the cowl seams. Use a small body filler squeegee to apply
a nice smooth coat. This will make the trunk pan installation hardly noticeable.
Depending on how much floor rust and how much new metal is
needed this job can take from 8-16 hours from start to finish.